Meizu M2 Mini USB Driver helps in connecting the device to PC. On this page, Android USB Drivers provide official Meizu M2 Mini drivers along with ADB Driver and Fastboot Driver.
Having trouble connecting Meizu M2 Mini to PC? It might be a driver problem, so just download Meizu USB Drivers and install them on Windows 10, 7, 8, 8.1 or XP PC. The Meizu M2 Mini USB Drivers provided here are official and are virus free. Based on your need download USB Driver for Meizu M2 Mini from the downloads section and install it on Windows PC by following the instructions provided below.
With Meizu M2 Mini USB Driver installed on PC, we can establish a secure connection between Computer and Mobile. This helps in transferring data like images, video, documents and other files to and fro from Mobile to PC. We have also provided Meizu M2 Mini ADB and Fastboot drivers which helps in passing commands to Phone via Command Prompt (CMD).
The Meizu M2 Mini USB Driver provided below can be used for both flashing Stock Firmware and other stuff, and also for normally connecting Meizu M2 Mini to Computer or Laptop.
Download Meizu M2 Mini USB Driver
Meizu M2 Mini CDC Driver for Flashing Firmware
Meizu M2 Mini VCOM Driver for Flashing Firmware
Meizu M2 Mini USB Driver for normal connecting to PC
The Meizu M2 Mini Fastboot and ADB drivers can be downloaded below.
Meizu M2 Mini ADB and Fastboot Drivers
Rate this download:
Also Download:
How to Install Meizu M2 Mini USB Drivers Manually:
Step 1 : Download and extract the driver on your computer.
Step 2 : Open Device Manager and Click on "Action ".
Step 3 : Now Click on "Add legacy hardware ".
Note : If the "Add legacy hardware " option is missing then click on the empty space inside the Device Manager and then click on "Action ". Now you should see "Add legacy hardware " option.
Step 4 : Click Next .
Step 5 : Select "Install the hardware that I manually select from a list (Advanced) ".
Step 6 : Select "Show All Devices " and Click on "Have Disk... "
Step 7 : Click on Browse .
Step 8 : Locate the extracted driver manually on your computer.
Step 9 : Click Open and then OK .
Step 10 : Choose the Driver you want to install and then Click on Next .
Step 11 : Your Driver will be installed and listed in the Device Manager.
Step 12 : If you see additional drivers in Step 10 , then follow the instructions from Step 3 to Step 9 again and choose the driver listed below the one which you have previously installed. Similarly, follow for all the additional drivers.
How to Install Meizu M2 Mini ADB and Fastboot Drivers:
Step 1 : Download the 15 Seconds ADB installer on your PC. If it is in the .zip archive then extract it to obtain the .exe file.
Step 2 : Right-click on the file and Run as administrator .
Step 3 : It should ask, whether you want to install ADB and Fastboot Driver on PC . Enter "Y" and hit Enter key.
Step 4 : Now it should ask whether you want to install ADB system-wide . Enter "Y" and hit Enter.
Step 5 : It should ask whether you want to install device drivers . Enter "Y" and hit Enter.
Step 6 : Follow the on-screen instructions.
Step 7 : Done.
Reader Interactions
Primary Sidebar
Select a Device Manufacturer
Select Device 360 3Q 4Good 5Star Aamra ABC Goldsun Accent ACE Acer ACI Adcom Admet Advan Advance Aermoo AFC AG Agetel AGM AGT Agtel Ainol Airis Airmax Airtel Aiwa Akai Akasaki Akua Alcatel Alcor Aldo Alive Allcall Alldocube Allview Allwinner Alphard Alps Altron Amazon Ambrane Amgoo Ami Amigoo Amoi AMP Ampe Amplicomms Amschel Amtrak Anee Ank Aole Aomor Aoson Aoto Aovo Aplus Aprix Apro Arbutus Archos Arise ARK Asiafone Ask Assistant Aston Astro Astrum Asugar Asus ASY Mobile AT&T Atman Attila Auxus Avea Avion Avov Avvio Axgio Axiom Axioo Axwire Azpen Azumi Babaosi Badai Baimi Baoking Bassoon BDFones Bedove Bee Beeline Beetel Beex Beidou Bellphone BenQ Beyond BFB BGH Bicix Bifer Bihee Billion Bingo Bird Bitel BKK BlackBear Blackberry Blackfox Blackview Blaupunkt BLB Bleck Bloom BLU Bluboo Blumix BML Bmobile Bontel Boss Style Boway BQ Brandcode Bravis Bravo Bsmobile BSNL Bundy BungBungame Bush Byond Bytwo Cagabi Callbar Calltouch Calme Calus Camfone Camon Cappu Carpad Casio Casper Caszh Cat Cayon CCE CCIT Celkon CellAllure Cellecor Centric CG Champion Changhong Changjiang Cheers Cherry Chico Chilli Chuwi Cilee CityCall Civo CKK CKTech Cktel Clarmin Clear Clementoni Cloudfone Clout CMX Cobalt Coddy Colch Colorfly Colorovo Colors Comio Condor Cong Conquest Contigo Coolgen Coolnet Coolpad Coship Covia Creo Croma Cross Crosscall Cube Cubot D-Tech Daewoo Daj Dakele Danew Dany Datawind Daway Daxian DBphone DCL DDC Dell Dengo Denver Desay Devante Dexp DHD Diamond Diemi Digicom Digiflip Digma Digo Digoor Dimo DingDing Discover Discoveri-y Disko Diyi DM DND Do Mobile Docoss DOK DOMO Doogee Doopro Doov Doppio Dotpad Douzo Dpatech Dreamgate DTC Dunns Duomi Duxiu DXD Dynamic E&L Ebest Eblu Berry Echo Ecoo Editorial Egreat Ei Ekinox Eko Elephone Elite Elitek Energizer Energy Energy Sistem Enes Enet Enie Enova Epad Ephone Essential ESZS Etel Eton Eurostar Evercoss Evertek EveryPhone Evolio Evolveo Exmart EXMobile Explay Facetel Faea Fero Figi Figo FinePower Firefly Fluo Fly Flycat FMT Fohow Fomi Fondi Forstar Fortis Fotola FPT Freedom Freetel Fujitsu Funker G Plus G-Tab G-Tide Garmin Gblack GDL Geecoo General Mobile Genesis GeniusTouch Genpro GenX Geotel GFI Gfive GGS Ghong Gicent Gigabyte Gigaset Gigi Ginger Ginzzu Gionee GLX Gmango Go Tech Goclever Gol Goldberg Gome Gomobile Gone Good One Google Goophone Gooweel Gowin Gphone Grand Greenberry Greentel Gretel GRight GS Gtel Gtouch GuoPhone GXQ H-Mobile Hafury Haier Haipai Haixu Hasee HCL HDC Helio hello Helowin Hercls Hero Hexabyte Highscreen Hiking HiLive Himax Hiro Hisense Hitech Hiwire Hiya Hkmi HMI Hocom HomTom Hongniu Hoow Hopo Hotmax Hotwav HP HPD Hsem HSI HSL HST HTC HTD HTM Huadoo Huaexl Huasi Huawei Hurricane Hyundai Hyve I-Boo I-INN I-Life i-Mobile i-Touch I.Robot iBall iBerry iBrit Icalee Ice phone IceMobile Icex iCherry Icon iHunt Ikall iKnock Ikon IKU iLA iLLY iLovfa iMan iMax IMI IMO Imobily iMoo Impression Imuz Inco Indus iNew Infinix InFocus Infone Innelo Inni Innjoo iNo Mobile Inoi iNova Inovo Intex Intouch Invens iOcean iOCO iOutdoor iPro IQ Mobile iQM Irbis iRulu iSmart Istar It Works iTechno itel Iuni Ivoomi Ivvi Jeasung Jeep Jepssen Jesy Jiake Jiaxin Jiayu Jinga Jivi JJS Jolla Josh Mobile Jumper Just5 JVC JXD K-Touch Kagoo Kaicom Kalley Kara Karbonn Kata Kazam KDW Kechaoda Keecoo Kelaida Kempler Kenbo Keneksi Kente Kenxinda Kimfly Kingbell KingSing Kingstar Kingzone Kiowa KKP Klassic Klipad Kodak Kogan Konka Koobee Koolmex Koolnee Krono Kruger & Matz Kult KXD Kyocera Kzen L-Max Land Rover Landvo Lanix Lapnet Laude Lava Leaf Leagoo Leagool Lecom LeEco Leegoog Leke Lemon Lenosed Lenovo Leotec Lephone LeRee Letv Lexia LG Linda Linnex LiteTel Liven LK-Mobile Lmkj logic Logicom Lolo Long Lordor Lovme Lumigon Luna Luxteck LV Mobile Lvtel LY Lyf M-Horse M.Party M4tel Mafe Magicon Mobile Magnus Mai Maichai Majestic Malata Mango Mann Manta Mapple Mark Marlax Massgo Massive Masstel Maxcom Maximus Maxtel Maxtron Maxwest Maxx Maxxcall Maze MBO MCI MDC Mediacom Medion Meeg MegaFon Meidou Meiigoo Meitu Meizu Mercury MEU MFT MGT Microdigit Microkey Micromax Micronex Mifaso MiGuer Mijue Milai Mint Mione MIQ Mirage Mito Mivo Miyu Mlais Mlled MLS Mobell Mobicel Mobiistar Mobistel Mobiwire Mobo Modoex Mofut Mogu Morefine Mosimosi Motolife Motorola Movic Movilser Mpai Mpgio Mpie MPT Mstar Mtech Mobile MTN Mtouch MTT Multilaser Mumi Mxnec Mycell Myfon Mynet MyPhone Myria Mytec Mytel Mywigo Navcity Navitel NDE Nec Neken Neo Neocore Neoson Newings Newman Nexcom Nextbit NextTab NFT NGM Nibiru Nikai Nipda NIU No.1 Noa Noain Nobux Nodis Nokia Nomi Nomu Nook Nous Nova Novinsun Nubia Nuu Nvidia Nyx Oale Obi Ocean Octenn Okapia Oking Okwu OLA Olive Omax Omoto Onda OneClick OnePlus Onida Ooredoo Opal Open Oplus Oppo Opsson Orale Orange Orientphone Orro OSE Oshiyama Osku Osmo Otium Otto Oukitel Ourstar Ovana Own Owwo OWXmobile Palma Panasonic Panco Pano Pantech Partner Mobile PCD PCsmart Peace Pelephone Phicomm Philco Philips PhoneMax Phonix Pioneer Pipo Pixelphone Pixil Pixus Platino Ployer Plum Polaroid Polytron Pomp Poptel Posh Mobile Positivo PPTV Premio Prestigio Prime Primux Prince Professional Pulid Puncher QBZ Qedirs Qiku Qlink QMobile QMX Qnet Qpad Qphone Qqmee Qrea Qsmart Qtouch Quantum Quatro Qube Qubo Qumo Rage Ramos Rangs Razer RCA Reach Mobile Red Hydrogen Redstar Remi Rinno Rivo Rokea Rokit Royalstar Royqueen RTK RugGear Runbo Ryte S-Color S-Tell Safaricom Saga Salora Samhe Samsung Sanno Sansui Santin Sanxing Sast Schok Se7en Seeken Seete Selecline Senap Senseit Senwa Servicom Sharp Shelby Sico Sict Sigma Simbans Simmtronics Simvalley Singtech Sinotec Sintel Siswoo Siwer SKG SKK Sky Sky Vega Skytex Skyview Skyworth Slim Smart Smartec Smartfren Smartisan Smartron Smile Snokor Snopow Soho Soja Solo Soloking Solone Sonim Sony SOP Sophone Soraka Spark SPC Speed Sphone Spice Spinup Spiria Sports Spox Sprocomm Ssky Starlight StarMobile STF Stil STK Strawberry Stream Stylo Stylus Sugar Summer Sunny Sunup Supraim Susan Swipe Syco SYH Symphony Syntax T-Cell T-Mobile Taiwan Tambo Tasen Tashan TCL Tech Techcore Teclast Tecno Teemi Teeno Teesso Teknosa Telcel Telco Telefunken Telego Telenor Telsda Tengda Tenor Texet THL Tianhe Tichips Tigers Tiitan Timi Timmy Tinmo Titan Titanic Tong Tooky Torque Toshiba Touchmate TP-Link Tplus Tradeno Treq Trio Tronton Truconnect True Truelife Turbo-X Turkcell Twinmos Twinovo TWM TWZ TXD Ubtel Ugoou Uhans Uhappy Ukozi Ulefone Ultimate UMI Umidigi Umiio Uneed Uni-Tel Unihertz Uniscope Uniwa Unnecto Unno Uoogou Usha Utta UUK V Phone V-Hope Vaio Vargo Vava VC Vchok Vega Venus Verizon Vernee Verssed Versus Vertex Vertu Verykool Vestel Vevo Vfone VG Vgo Tel Viaan Vibo Viboee Videocon Vido Viettel Vifocal Vifone Vinci Vinko Vinovo Vipro Vitu Vivas Vivax Vivi Vivk Vivo VK Vkworld Vmi Vmobile VO-Com Voco Vodafone Voice Voicetel vokuss Volkssmart Vonino Vortex Voto Voyo Vsmart Vsun Vtel W&O Wainford Walton Wanmi Wave Waywalkers We Weedoo Weiimi Weimei Welcome WellPhone Wespro Western Wexler Wham Whitecherry Wickedleak Wieppo Wigor Wiko Wikoo Wileyfox Winds Winfone Wing Wink Winmax Winnovo Winstar Wintouch Wolder Woxter Wynncom X-Funny XBO XBQ Xcom XDU XGody Xiaolajiao Xiaomi Xiaoxing Xillion Xion Xmi Xolo Xone Xplay XPX Xstong Xtel Xtouch Xtreamer XYS XYZ YaHalla Yandex Yasyas YBZ Yepen Yes YesTel Yezz Yimi Yooz YotaPhone YU Yuho Yunsong Yusun Yxtel ZDReal Zears Zebronics Zelta Zen Mobile Zenek Zentality Zentel ZH&K ZHT Zigo Ziox Zip Zoji Zolo Zonda Zoom Zopo ZT Mobile ZTE ZTU Zuoku ZURI Zuum Zync ZYQIf you are an owner of Meizu M2 and looking out for usb drivers to connect your device to the computer, then you have landed on the right page. Download Meizu M2 USB driver from here, install it on your computer and connect your device with PC or Laptop successfully.
Here, we have provided three usb drivers for your Meizu M2.
USB Driver Type:
USB Driver Purpose:
File Size:
15 KB
Download Now
USB Driver Type:
USB Driver Purpose:
For flashing Stock firmware on your device.
File Size:
11 KB
USB Driver Type:
ADB Driver
USB Driver Use:
For connecting your device to a computer.
File Size:
8.3 MB
Steps To Install Meizu M2 CDC Driver In Computer
Video Tutorial
Step 1: To get started, download the driver and extract it on your desktop.

Step 2: Now, open Device Manager > Action > Add Legacy Hardware .

Step 3: Next, click “Next

Step 4: Now choose “” and click “Next ”.

Step 5: Once done choose “Show all devices ”, click “Next ” and choose “Have a disk

Step 6: Next ” again.

Step 7: Click “

Step 8: Next, click “Finish ” to complete installation.

That’s it. Your device driver is now successfully installed on your computer.
Steps To Install Meizu M2 VCOM Driver In Computer
Video Tutorial
If you don’t like this video tutorial or if you would like to get more instructions, then continue reading.
Step 1: To get started, download the driver and extract it on your desktop.

Step 2: Now, open Device Manager > Action > Add Legacy Hardware .
Step 3: Next, click “Next ” in the Add legacy hardware wizard.
Step 4: Now choose “Install the hardware that I manually select from the list (Advanced) ” and click “Next “.
Step 5: Once done choose “Show all devices “, click “Next ” and choose “Have a disk ” to select the extracted file manually from your computer.
Step 6: Then, select “usb2ser_Win7 ” setup for 32 bit OS or select “usb2ser_Win764 ” setup for 64 bit OS.

Step 7: Now to start installing your new hardware, click “Next ” again.

Step 8: Click “Install this driver software anyway ” in the Windows security prompt window.
Step 9: Next, click “Finish ” to complete installation.

You are done. Your device driver is now successfully installed on your computer.
Steps To Install Meizu M2 ADB Driver In Computer
Video Tutorial
If you don’t like this video tutorial or if you would like to get more instructions, then continue reading.
Step 1: To get started, download the driver and extract it on your desktop.

Step 2: Now, open Device Manager > Action > Add legacy hardware .
Step 3: Next, click “Next ” in the Add legacy hardware wizard.
Step 4: Now choose “Install the hardware that I manually select from the list (Advanced) ” and click “Next “.
Step 5: Once done choose “Show all devices “, click “Next ” and select the extracted file manually from your computer.
Step 6: Now to start installing your new hardware, click “Next ” again.

Download Meizu M2 Note Official VCOM USB Driver For Flashing Firmware
How to manually install Android CDC and MediaTek VCom Driver
Download Meizu M2 Note Official ADB USB Driver For Normal Connecting
How to Install (video)
What is a Meizu M2 Note USB Driver?
Meizu M2 Note is an important part for all android devices which allows you to easily connect Meizu M2 Note device or tablet through the personal computer or laptop. In other words, it is a group of more than one files or program which create a bridge between your Meizu M2 Note devices and the personal computer to communicate and sharing the files between each other. After properly connecting your Meizu M2 Note device with the personal computer via USB driver. You will be able to do many more important things.
How to install Meizu M2 Note USB and ADB driver?

1. Extract Meizu M2 Note on your Windows Computer.
2. Now, Open Device Manager on your Computer (to open device manager > Press Win + R to launch Run Command > In Run Command Window type devmgmt.msc and Hit OK Button).
3. Once Device Manager is Launched, Click on your Computer Name .
4. Now, Click on Action menu and Select Add Legacy Hardware .
5. In the Add Hardware Wizard, Click on Next Button.
6. Now, Select Install the Hardware that I manually Select from a list (advanced) and Click on Next Button.
7. Now, under common hardware types > select on show all devices and click Next Button.
8. Now, Click on Have Disk Button > Locate the Meizu M2 Note Android Driver (CDC Android_Driver OR Android_VCOM_Driver) on your Computer.
9. Once your driver is listed in the blank area, click on Next to continue.
10. Now, Again Click on Next Button.
11.
Now, you will be able to see Windows Security Dialog Box. Under Windows Security Dialog Box, Select Install this driver software anyway
.
Now, device manager will install the Android driver on your computer (may take 1-2 minutes only).

12. Now, Click on Finish button to close the Add Hardware Wizard.
13. Below you can see the Meizu M2 Note Android driver is installed and listed in the device manager.
So this was our guide on How to install Android CDC Driver Manually , I hope the methods given above helped you in installing Android CDC Driver .
How to Install Meizu M2 Note ADB and Fastboot Drivers:
1 : Download the 15 Seconds ADB installer on your PC. If it is in .zip archive then extract it to obtain .exe file.
2 : Right-click on the file and Run as administrator .

3 : It should ask, whether you want to install ADB and Fastboot Driver on PC . Enter “Y” and hit Enter key.
4 : Now it should ask whether you want to install ADB system-wide . Enter “Y” and hit Enter.
5 : It should ask whether you want to install Meizu M2 Note device drivers . Enter “Y” and hit Enter.
6 : Follow the on-screen instructions.
7 : Done.
Meizu M2 Note usb Driver Signature Error :
If you got Driver Signature Error While installing Meizu M2 Note Driver then See this Video to fix this problem.
If you are trying to flash stock firmware on your device then download CDC and VCOM Driver Only. ADB Driver will not work for flashing the stock firmware.
Непрерывное развитие рынка мобильных телефонов приводит к тому, что постоянно выходят новые модели смартфонов. Стремительно набирающая обороты компания MEIZU также все время предлагает пользователям более усовершенствованные линейки своих аппаратов. Однако и более ранние модели MEIZU остаются по-прежнему востребованными и привлекательными, что достигнуто благодаря поддержке актуальности программного обеспечения в продукции компании. В частности, компания регулярно выпускает обновления для своей фирменной оболочки Flyme.
К примеру, высокой популярностью среди пользователей пользуется Meizu M2 Mini, прошивку которого можно регулярно обновлять, за счет чего телефон не теряет свою актуальность, хотя был выпущен в 2015 году. Данный обзор будет посвящен теме прошивок вышеупомянутого телефона. Для него существует множество модификаций прошивок, в частности:
- Прошивка International является мультиязычной, в том числе поддерживает русский язык. Она ориентирована на европейский рынок.
- Universal Public - это универсальная прошивка, предусмотренная для различных моделей телефонов, а также подходит для Мейзу М2 Мини. Единственное, что стоит отметить, так это то, что в ней отсутствует поддержка русского языка.
- Unicom заточена под оригинальную китайскую прошивку и также лишена русского языка.
Помимо официальных прошивок существует большое количество кастомных, которые разрабатывают сами пользователи. Стоит предупредить, что к установке кастомных нужно подходить очень сознательно, поскольку установка некачественного софта может привести к неисправностям телефона.

Перед тем как начать установку, необходимо произвести подготовительный этап, который не менее важен, чем сама установка. Для начала необходимо сделать резервное копирование данных с телефона, поскольку они будут полностью утеряны. Для того чтобы это сделать, нужно:
- Зайти в «Настройки », далее перейти в раздел «Личное » и выбрать пункт «Память и резервные копии ».
- Перейти в раздел «Другое » и выбрать функцию «Копирование и восстановление ».
- Далее нужно выбрать хранилище, куда будут перенесены данные, выбрав пункт «Выбрать место хранения ». После этого необходимо выбрать отметки напротив того типа данных, которые нужно скопировать. Отметив все файлы, нужно нажать «Начать копирование ».

Все удаленные данные с телефона легко будет перенести на него обратно после обновления, действуя по вышеперечисленным пунктам, только в последнем пункте вместо «Начать копирование » нужно будет выбрать «Восстановить ».
Сам процесс прошивки можно разделить на такие этапы:
- Скачать прошивку с официального сайта.
- Проверить имя файла и расширение.
- Запустить смартфон в «Recovery mode ».
- Перезагрузить смартфон Meizu.
Рассмотрим каждый пункт в отдельности.
Скачать прошивку с официального сайта
До скачивания файла-установщика нужно произвести подготовку телефона, в частности, нужно позаботиться о том, чтобы телефон имел полный заряд батареи. Для закачки официальной версии нужно зайти на сайт производителя и выбрать последнюю версию прошивки. Скачиваемый файл нужно обязательно сохранить в корне памяти устройства.

После того как файл будет скачан, принципиально важно убедиться в том, что файл имеет правильное имя и расширение, в противном случае установка может произойти некорректно или не начаться вовсе. Для проверки имени нужно перейти в корень памяти и найти файл под названием «update.zip» . Если установочный файл будет иметь другое имя, то будет выдана ошибка «Firmware not found ».
Запускаем смартфон в Recovery mode
Для того что запустить телефон в режиме «Recovery mode », нужно его полностью выключить, а далее нажать и удерживать сразу две клавиши - «Включение » и верхнюю часть качельки «Громкость » - до момента появления названия телефона или надписи «System Upgrade ». После этого откроется поле с настройками прошивки. В появившемся поле нужно выбрать пункт «System Upgrade Start », после чего начнет устанавливаться прошивка.

Процесс установки является достаточно продолжительным и может занять определенное количество времени. На этапе установки нельзя пользоваться телефоном и самостоятельно без надобности включать его или выключать. По окончании установки смартфон перезагрузиться в автоматическом режиме, после чего нужно будет произвести некоторые настройки: выбрать язык, осуществить подключение к сети и другие действия.
С помощью компьютера
Установка при помощи компьютера во многом схожа с вышеописанным способом и состоит из тех же этапов. Компьютер же необходим в том случае, когда прошивка при помощи телефона сопряжена с какими-либо трудностями. Специальные утилиты, помогающие корректно установить прошивку, помогут оптимизировать данный процесс.

Скачать прошивку
Перед скачиванием установочного файла нужно осуществить настройку синхронизации смартфона с компьютером. Следует произвести следующие действия:
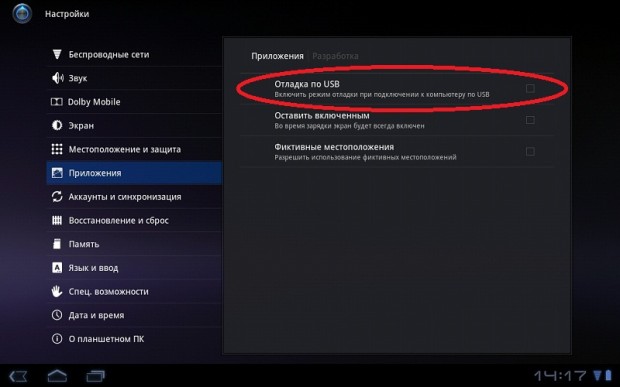
- Необходимо включить режим «Отладка по USB ». Чтобы это сделать, нужно зайти в «Настройки » и выбрать пункт «О телефоне », находящийся в нижней части списка.
- Далее тапнуть пять раз по пункту «Версия прошивки: Flyme », пока не появится уведомление «Теперь вы в режиме для разработчиков ».
- После этого нужно вернуться в пункт «Настройки » и войти в раздел «Система », в котором нужно выбрать «Спец. возможности ».
- Далее перейти к функции «Для разработчиков », где нужно перевести переключатель в активный режим «Отладка по USB ».
Далее нужно загрузить на компьютер файл с прошивкой (выше описан процесс скачивания с официального сайта производителя). Если нет возможности сохранить прошивку на телефон, то сохраняете её в корень карты памяти и вставляете её в телефон.
Проверка имени файла и расширения
При скачивании файла с официального сайта Мейзу он будет иметь название и расширение «update.zip ». И ваш скачанный файл должен иметь такое же имя и расширение.
Подключение телефона в Recovery mode
Чтобы включить на телефоне режим «Recovery », необходимо выполнить те же действия, что и для прошивки при помощи телефона, а именно: одновременно зажать и удерживать кнопки «Включение »и «Громкость » (вверх). После этого на экране появится надпись «Meizu » и загрузится меню «Recovery mode ». Переведение телефона в данный режим является неотъемлемой частью процесса.
Прошивка
В появившемся поле нужно выбрать пункт «System Upgrade ». Далее нужно нажать на пункт «Start », после чего начнет устанавливаться прошивка. В процессе установки прошивки могут происходить неоднократные перезагрузки телефона. Они могут быть как автоматическими, так и требовать вмешательства пользователя. Поэтому необходимо внимательно следить за происходящим процессом. Понять, что Мейзу M2 Mini обновился окончательно, можно тогда, когда телефон сам перезагрузится и включится в привычном для пользователя виде. Перед полноценной работой с телефоном могут потребоваться некоторые настройки, которые устройство предложить осуществить.
On this page, we have managed to share the official usb driver for Meizu M2 Mini Device. If in case you were already searching for the usb driver for this device, then this page will help you out.
There are 3 usb driver available for your device. Two of them can be used to flash the stock firmware on your Mediatek Device and Last is for normal connecting the device to the computer.
How to install driver manually
Step 1 : Download and extract the driver on your computer.
Step 2 : Open Device Manager and Click on Add the Legacy Hardware Menu.
Step 3 : Click Next.
Step 4 : Select Install the hardware that I manually Select from a list.
Step 5 : Locate the extracted driver manually on your computer.
Step 6 : Click Add.
Step 7 : Your Driver will be installed and listed in the Device Manager.
Important Notes :
[*] Driver Signature Error : If you got Driver Signature Error While installing the Driver then See this Video to fix this problem.
[*] If you are trying to flash stock firmware on your device then download CDC and VCOM Driver Only. ADB Driver will not work for flashing the stock firmware.
[*] Stock Firmware : You can download Meizu M2 Mini Stock Firmware from .